Cheesy Rice, a recipe

>> Sunday, February 28, 2010


This is a kid friendly, easy to make rice recipe. It has a creamy texture sort of along the lines of risotto. It's a staple on our menu!

Ingredients:

1/3 of a white onion, diced
1 TBSP butter
1 1/3 cups long grain white rice
4 cups (one 32 oz box) chicken broth
3/4 cups grated parmesan cheese
black pepper to taste

In a saucepan, melt butter over medium heat. Add onions and saute for 3 minutes. Add rice to the pan and cook an additional 2-3 minutes until it begins to brown and takes on a nutty aroma. Add chicken broth and black pepper, bring to a boil.
Reduce heat to low, cover and simmer for 20-25 minutes. Remove from heat, stir in the parmesan cheese, recover and let it sit for 5 minutes.

Enjoy!


**UPDATED** This makes quite a large batch of rice. For an idea of what to do with left over rice, check out this recipe for stuffed red bell peppers!

Read more...

So tired, what a day!

>> Saturday, February 27, 2010

Woke up at 6:30 after working until 1:30 last night to get things finished up and was out of the house at 7 this morning for the craft fair... the weather kept many of the shoppers at home but it was still a decent turnout, I made some good connections and even met up with an old family friend whom I hadn't seen since I graduated high school. Here are a couple of photos of my half of the table. (Shared the table with my friend, Paula)


Very tired, sorry this isn't a longer post, I'm off for a well deserved rest!

Read more...

Neck deep in organizing for a craft show...

>> Friday, February 26, 2010

Here's a peek at the current state of my dining room as I prep everything for the craft show tomorrow


And here's the set up from the last show I did

I've showed you mine, now you show me yours. I love looking at photos of how other vendors set up their displays. This is my first time using MckLinky and it's rather spur of the moment, so I'm not sure how well it'll go over, but let's give it a shot, shall we?!

If you don't do shows, but still want to show off, link up to your craft room/space/studio!

MckLinky Blog Hop

Read more...

Eugh, Ewwww, Gross. As promised, a jeweler's hands...

>> Thursday, February 25, 2010


Note the one remaining fingernail on my left pinkie. At the beginning of this latest stint of work, I actually had ten long, lovely nails all naturally my own.

And they grey? That's silver particles ground into my skin that won't go away for a few more days. Even with scrubbing. Oh and the tear on my thumbnail. Yea, that's gonna hurt.

The rest of this gross skin is all filing and sanding related. It's hard to have metal files and sandpaper run across your fingers for hours and still have Palmolive smooth hands. Ooooh, that little wound on my index finger was especially fun. I ran a metal file ran right across it and took the skin clean off. What? TMI?
Finally done with the hard work, now a long hot soak and some major nail brush action and maybe just maybe I won't have fugly man hands in the morning. But I wouldn't count on it.

Read more...

Making pretty stuff is exhausting!

>> Wednesday, February 24, 2010

Yawn! I am tired and achy today and sit in the dark kitchen looking out at a cloudy and wet morning. I pulled a 10 hour work day yesterday in preparation for the craft show this weekend. I hit an all time high for soldering work- 38 individual pieces cut and soldered together.

Today I have to trim off all the excess silver and file them smooth so I can attach bails to the pendants, clasp rings to the bracelet pieces and loops to the tops of the earring pieces. Then I have to do all that attaching. If I can manage to get that finished before it's time to start dinner, I'll begin setting the pottery/shells/sea glass. I'm reallllllly hoping to get this stuff finished tonight because my back and neck are killing me from sitting, stooping and standing over this work for so many hours. (not to mention I need to get this stuff polished by Friday night so I can card it all for Saturday morning!)

Aaack, what the heck am I doing posting, I need to get to work!

Maybe later I'll treat you all to a photo which I'll entitle "The beauty of a jeweler's hands". Oh boy, that'll be a nice one!

Read more...

Vintage goodies... this week it's milk glass!

>> Tuesday, February 23, 2010


Squeaking in just in the nick of time (it's still Tuesday!) for Retro Tuesday over at The Crazy Suburban Mom-

This week I have a cute little individual sugar bowl and creamer set. It's milk glass made by Westmoreland Glass. The pattern is called paneled grapes. What I love about this set is the sugar bowl has its lid. I did some searching when I came home with them from the consignment shop and discovered that of the dozen or so pieces listed on eBay not one of them has the lid with it! I guess people must misplace them or break them a lot or something.

In any case, I think it's really cute, but as much as I like it (and was dying to buy a sugar bowl and creamer set) it doesn't match my dishes like I wanted it too. The grapes are just too formal to go with my 50's atomic style stuff. So- this pair will be going to eBay when I get a free minute to list them. I'll open the bidding at $8.99. I hope they find a good home!

Linked up to Vintage Thingies Thursday at The Coloradolady

Read more...

So this is what 78 pounds of meat looks like...

>> Monday, February 22, 2010

Budget and bulk grocery shopping, pantry stocking, coupon cutting, PART ONE

Chronicling my learning experiences as I begin to track our spending and eating habits in an attempt to create a food budget that is smaller than our current unbudgeted (but still done on the cheap) food lifestyle.


The first thing I've begun doing is saving receipts. ALL our food related receipts. I'm hoping I can begin to pick out the patterns- when we shop for convenience instead of for savings, how often we eat out (and why), what sorts of foods we are buying and what percent of our total food bill does each type make up.

I'm still in the fledgling stages of this process- I have almost 1 month worth of receipts in a giant mound on my desk. I didn't want to wait to start blogging though- because this past Thursday brought a payday and with it, an on-call paycheck, which meant extra grocery money to go to Sam's Club and stock up on meats.


SO- while this process is probably going to be choppy and bounce around; topic to topic as I do stuff, here's what I've learned so far:

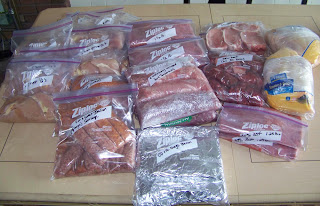
That separating 78 pounds of meat into individual meals thrills the hell out me, lol. Today I spent 2 hours, 28 gallon size zip top bags, 14 sandwich size zip top bags, about 8 feet of plastic wrap and 3 feet of aluminum foil to pack up 48 meals worth of beef, pork and chicken products.

Here's the breakdown:

(2) whole oven roaster chickens (2 meals each)
(8) 5 pc bags Italian sausage
(3) 1lb packs bacon
(8) 1 ½ lb bags 90% lean ground beef
(2) 1 ¼ lb bags 80% ground beef
(6) 1 lb bags stew beef
(6) pork tenderloins
(2) 4 ½ pc bags pork chops
(9) 5-6 pc bags boneless chicken breast halves
_________________________________________
Total cost for 48 meals: $169.67
Average $3.53 worth of meat per meal OR $.71 per person


I know, I am INSANE, right? I can't begin to express how excited I was doing the math for this! (read: dork)

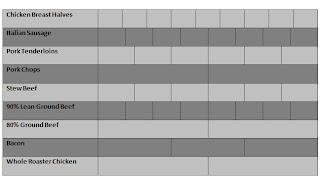
The next thing I did was make a simple little list to tape to the top of my chest freezer so I could keep track of what I have. I love having an extra freezer to store all this stuff, but if you're in the market, I highly recommend getting a stand up freezer with shelving. I lose stuff in the bottom of the freezer constantly and have to dig around shuffling stuff and making even more of a mess every time I want to pull out something for dinner- which inevitably leads to me buying stuff I already have simply because I can't find what I'm looking for!


So that's what I did today, and I'm damn proud of it, too! Now I need to work on menu planning based on the meats and dry goods I have. (Ugh, dry goods- my pantry, the bane of my existence. I have no idea how to work out a good system for stocking it, but that's another post entirely!)

Read more...

Seashell barrettes and a few more pendants finished

>> Sunday, February 21, 2010

Finally managed to get photos of my little seashell barrettes taken. These are going up for sale in my Etsy shop for just $4 a pair!

Rainbow Trochus Shell Barrettes

Pearl Umbonium Shell Barrettes

Nutmeg Shell Barrettes

White Clam Shell Barrettes

Purple Top Cowry Shell Barrettes

Rainbow Coquina Shell Barrettes

White Nassa Shell Barrettes

Pink Umbonium Shell Barrettes

Orange Nutmeg Shell Barrettes


And the last of the completed pendants:

Blue Pottery Shard Pendant

Bay Scallop Shell Pendant

Cobalt Blue Sea Glass and Pottery Shard Pendant


Mussel Shell Pendant

Read more...

Saturday Night Dinner- Loaded Nachos with Turkey Chili Topping

>> Saturday, February 20, 2010


Chili Ingredients:

1 package of ground turkey meat (usually a little over a pound)
1 medium onion, chopped
2 15.5 oz cans of bean, drained (red kidney, canellini, black beans, chick peas will all work)
1 15 oz can diced tomatoes with juices
1 cup chicken broth, reserve 1/4 cup
1 tsp jarred minced garlic or 2 cloves, minced
1 TBSP olive oil
1 packet of chili seasoning mix
1 TBSP flour
1 tsp salt
1/2 tsp sugar
1/2 tsp cumin

Heat olive oil in a large pot over medium heat. Add onions and cook for 2 minutes. Add garlic and cook 1 minute longer. Add in the ground turkey meat and cook until browned, 7-8 minutes.

Add canned tomatoes, chili seasoning packet,
salt, sugar and cumin and stir to combine.

Pour in 3/4 cup of chicken broth. In a seperate bowl take reserved 1/4 cup of broth and flour and whisk together. Pour this mixture into the chili to thicken.

Add your beans (I switched from red kidney to cannellini)
Cover and simmer for 20-30 minutes.


Nachos Ingredients: (this will make two batches)

1 family size bag of your favorite nacho chips
shredded iceburg lettuce (about 1/4 head)
two large roma tomatoes, diced
1 small red bell pepper
1 bundle of green onions, chopped
1 8 oz bag shredded cheese

Preheat oven to 400 degrees. Per batch: spread half the nacho chips evenly onto a foil lined baking sheet. Top with half the turkey chili, tomatoes, red pepper and cheese.
Bake 6-8 minutes or until cheese is melted and bubbly.
Remove from oven and garnish with lettuce and green onion before serving.

Optional side toppings: sour cream, guacamole and salsa

Kid tested

And approved!

Read more...

Blog template by simplyfabulousbloggertemplates.com

Back to TOP